Hi all,
I will soon be replacing the filter capacitors and tubes in a friends DR405 amplifier. A question he has asked me, whick I would like to run past you guys, is whether there would be any negative effect in increasing the 100uF filter caps to 200uF. I'd expect there to be less power supply ripple as the amp is pushed harder. (Heh, I'd expect buildings to collapse should that amp be pushed hard). He is a bass player, so please keep that in mind.
Your opinions are greatly appreciated.
Many thanks,
Emil
DR405 filter caps and repairs
Moderator: Mods
-
snarfusmaximus

- Posts: 9
- Joined: Wed Apr 13, 2011 10:56 pm
- Location: Melbourne, Australia
-
snarfusmaximus
- Posts: 9
- Joined: Wed Apr 13, 2011 10:56 pm
- Location: Melbourne, Australia
Re: DR405 filter caps and repairs
Whoops, posted in the wrong section. Mr. Moderator, could you please move this to "Hylight Era Amps"?
Thanks,
Emil
Thanks,
Emil
-
OldSchoolDave
- Posts: 2060
- Joined: Wed Nov 14, 2007 9:24 pm
- Location: HP, NC USA
- Contact:
Re: DR405 filter caps and repairs
Donesnarfusmaximus wrote:Whoops, posted in the wrong section. Mr. Moderator, could you please move this to "Hylight Era Amps"?
-
Dr.HI-TONE
- Site Admin
- Posts: 2675
- Joined: Wed Nov 14, 2007 8:51 pm
- Location: HIWATT Valley
Re: DR405 filter caps and repairs
I would recommend using the stock values. I can't imagine much if any benefit to increasing the values.
I would be interested in hearing Prof. Huss' opinion on this.
Very cool amp!
I would be interested in hearing Prof. Huss' opinion on this.
Very cool amp!
Re: DR405 filter caps and repairs
I think doubling the main cap bank wouldn't hurt anything, and may even make it punchier at higher volumes.  Since there are two separate sets of diodes involved, the extra surge current at power-on shouldn't hurt anything. The 400 supply is very similar to the 200, so beef it up, by all means.
--mark
--mark
-
Dr.HI-TONE
- Site Admin
- Posts: 2675
- Joined: Wed Nov 14, 2007 8:51 pm
- Location: HIWATT Valley
Re: DR405 filter caps and repairs
as if those beasts need to be punchier
Re: DR405 filter caps and repairs
Hehe, I'm gonna use 250uf's on my build
@snarfusmaximus: please take many pictures if you're going to change caps! Please
@snarfusmaximus: please take many pictures if you're going to change caps! Please
-
OldSchoolDave
- Posts: 2060
- Joined: Wed Nov 14, 2007 9:24 pm
- Location: HP, NC USA
- Contact:
Re: DR405 filter caps and repairs
I believe we established a long time ago that "need" falls far behind "want" when it comes to HiwattsDr.HIWATT wrote:as if those beasts need to be punchier
Dave
-
snarfusmaximus
- Posts: 9
- Joined: Wed Apr 13, 2011 10:56 pm
- Location: Melbourne, Australia
Re: DR405 filter caps and repairs
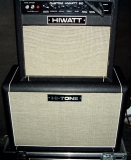
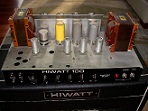
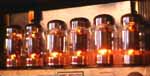
Oh yes, we will be taking pictures. As a matter of fact, there are pictures of his amp here:
http://gallery.me.com/mattkg/100009
Have fun!
Emil
http://gallery.me.com/mattkg/100009
Have fun!
Emil
Re: DR405 filter caps and repairs
Thanks man, that's very helpful!snarfusmaximus wrote:Oh yes, we will be taking pictures. As a matter of fact, there are pictures of his amp here:
http://gallery.me.com/mattkg/100009
Have fun!
Emil
It's very clean amp, your friend is lucky man
Re: DR405 filter caps and repairs
Oh yes, one more thing.
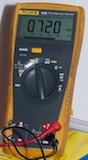
Could you please measure voltages on V5? That's the preamp tube in the middle.
That would be very helpful for my build, thank you!
Could you please measure voltages on V5? That's the preamp tube in the middle.
That would be very helpful for my build, thank you!
-
snarfusmaximus
- Posts: 9
- Joined: Wed Apr 13, 2011 10:56 pm
- Location: Melbourne, Australia
Re: DR405 filter caps and repairs
Sure, happy to post what ever you need although it will possibly be a few weeks before we get started on the restoration. I'll definitely be around with a question or two because biasing this thing will be scarey.
Have fun!
Emil
Have fun!
Emil
Re: DR405 filter caps and repairs
Thanks, if you need any help with biasing, we are here for you!snarfusmaximus wrote:Sure, happy to post what ever you need although it will possibly be a few weeks before we get started on the restoration. I'll definitely be around with a question or two because biasing this thing will be scarey.
Have fun!
Emil
Re: DR405 filter caps and repairs
Wow. That amp looks great for its age. I don't think we've previously seen a DR405 from 1976. It's nice to know that another one exists given that it's so rare. It looks like someone moved the serial tag from chassis to headbox?
I installed new filter caps with the same capacitance values when I restored my 1973 DR405. It's PLENTY punchy enough for me with little or no sag, but a bit more filtering couldn't hurt anything I suppose.
I installed new filter caps with the same capacitance values when I restored my 1973 DR405. It's PLENTY punchy enough for me with little or no sag, but a bit more filtering couldn't hurt anything I suppose.
Re: DR405 filter caps and repairs
Hi everyone,
I'm the owner of the amp being discussed, so I thought it was about time that I chimed in.
Firstly, I thought you all might be interested in a bit more background on it....
I purchased the amp about 10 years ago from a shop here in Melbourne (AU) and used it as-is for a few years (playing in a band with Mr Snarfus at the time). The photos linked here were taken maybe 3-4 years ago when I last planned to restore the beast (it already having sat around unused for a while and definitely not performing to spec anymore), but then I ended up having to shelve the plan until recently. Those photos show it pretty much as it was when I purchased at, as I had done nothing to it and had been very careful to look after it as it deserves.
As far as I can tell, it is pretty much all original, minus two of the GEC KT88s, which had been replaced before I bought it. The store where I bought it couldn't tell me much other than that it was brought over by someone who emigrated here and then spent most of its life living in a studio... That and the fact that it came with a very solid road-case goes a long way to explaining the original condition. I remember being absolutely stunned to see it there in the shop (having only popped in to pick up some strings) and being even more stunned once I played through it. Obviously I couldn't leave the store without it (thankfully they took Visa card ). I keep saying to the guy at the store "wow, I really can't believe you have one of these things here!! How long has it been sitting there??" The guy couldn't really understand my enthusiasm for the amp and simply mused "well, no-one really wants an old amp with KT88s these days...".
Alas that's about all I can provide in the way of backstory - I don't know who the previous (perhaps original? owner) was, or which studio it lived in for so many years.
I also want to reassure everyone that we will be carefully documenting everything we do to the amp, as well as taking even more detailed photos before beginning, during the process and after. I will also submit all the crucial info to the registry.
First thing I wanted to ask about is whether anyone here has ever encountered another Hiwatt with side-handles (moulded plastic, fitted into rectangular holes in the side of the case) and no top handle? I've never seen that done on any other Hiwatt (admittedly they are pretty thin on the ground in oz), but looking at the original condition of the amp, I have no reason to suspect it's not original. There are certainly no screw holes in the top where an original handle might have been. Maybe it was a customer request, or just an experiment... As to Zells' comment re- the serial tag, again I have no idea... How you see it in the photos is how it was when I received it.
Secondly, I just wanted to run my plans for the repairs past the group for sanity-checking. Am always happy to receive advice from folks more knowledgeable, so please pipe up if you see any problems.
Basically, when put into storage, the amp was operational, but sounding weak and not great in general. Also, the power switch had broken internally and was stuck in the ON position regardless of where the switch was set. The plan is therefore as follows:
1. Replace the power switch (correct replacement + a spare already obtained from Clayton@VHR)
2. Replace the filter and bias caps (regardless of whether they test OK, I don't need to skimp on a few $) with F&T cans using
4 x 100+100uF/500V configured as 200uF before the choke and 1 x 50+50uF/500V configured as 100uF after the choke. Bias cap will be replaced with another F&T 50+50uF/500V as well. The 16+32uF cap for the preamp will be replaced with an F&T 32+32uF.
3. Replace screen-grid resistors with 2W metal film (two originals are toast as can be seen in the photos).
4. Replace all the tubes to begin with. I expect those poor old GECs are long gone by now and have no idea whether the preamp tubes are ok or not. I figure better to replace everything first, ensure everything is working well and then roll the old preamp tubes back in and compare if I feel so inclined. The plan is Tungsol for the ECC83s (current fav) with EH for the ECC81 and the KT88s. Would go for Tungsol on the 81 as well, but then will have order it from a different place.
5. Bias it up (very carefully).
6. Connect it up to a big pile o' speakers, plug in the EB-3L and proceed to see if it registers on the richter scale
Also, the mains fuse has been upped to 7A for some reason... I plan to go back to 5A and see how we go...
We have a decent soldering iron, a 'scope and also 4 x 100W rated 8ohm dummy loads. We've also both repaired plenty of amps in the past, though nothing quite this large.
I would really appreciate of some opinions on this plan before we get stuck in. Anything else that we should plan for up-front? Any suggestions for other things to watch out for? Other issues, such as noisy pots or bad sockets will of course also need to be rectified, should we encounter them. All original parts will be put aside and kept as well. Any tips for de/re-soldering the PSU wiring with a minimum of insulation meltage would also be handy.
Once we get stuck into it, we'll be happy to take any measurements or answer any questions about the amp that we can.
Thanks,
-Matt.
I'm the owner of the amp being discussed, so I thought it was about time that I chimed in.
Firstly, I thought you all might be interested in a bit more background on it....
I purchased the amp about 10 years ago from a shop here in Melbourne (AU) and used it as-is for a few years (playing in a band with Mr Snarfus at the time). The photos linked here were taken maybe 3-4 years ago when I last planned to restore the beast (it already having sat around unused for a while and definitely not performing to spec anymore), but then I ended up having to shelve the plan until recently. Those photos show it pretty much as it was when I purchased at, as I had done nothing to it and had been very careful to look after it as it deserves.
As far as I can tell, it is pretty much all original, minus two of the GEC KT88s, which had been replaced before I bought it. The store where I bought it couldn't tell me much other than that it was brought over by someone who emigrated here and then spent most of its life living in a studio... That and the fact that it came with a very solid road-case goes a long way to explaining the original condition. I remember being absolutely stunned to see it there in the shop (having only popped in to pick up some strings) and being even more stunned once I played through it. Obviously I couldn't leave the store without it (thankfully they took Visa card
Alas that's about all I can provide in the way of backstory - I don't know who the previous (perhaps original? owner) was, or which studio it lived in for so many years.
I also want to reassure everyone that we will be carefully documenting everything we do to the amp, as well as taking even more detailed photos before beginning, during the process and after. I will also submit all the crucial info to the registry.
First thing I wanted to ask about is whether anyone here has ever encountered another Hiwatt with side-handles (moulded plastic, fitted into rectangular holes in the side of the case) and no top handle? I've never seen that done on any other Hiwatt (admittedly they are pretty thin on the ground in oz), but looking at the original condition of the amp, I have no reason to suspect it's not original. There are certainly no screw holes in the top where an original handle might have been. Maybe it was a customer request, or just an experiment... As to Zells' comment re- the serial tag, again I have no idea... How you see it in the photos is how it was when I received it.
Secondly, I just wanted to run my plans for the repairs past the group for sanity-checking. Am always happy to receive advice from folks more knowledgeable, so please pipe up if you see any problems.
Basically, when put into storage, the amp was operational, but sounding weak and not great in general. Also, the power switch had broken internally and was stuck in the ON position regardless of where the switch was set. The plan is therefore as follows:
1. Replace the power switch (correct replacement + a spare already obtained from Clayton@VHR)
2. Replace the filter and bias caps (regardless of whether they test OK, I don't need to skimp on a few $) with F&T cans using
4 x 100+100uF/500V configured as 200uF before the choke and 1 x 50+50uF/500V configured as 100uF after the choke. Bias cap will be replaced with another F&T 50+50uF/500V as well. The 16+32uF cap for the preamp will be replaced with an F&T 32+32uF.
3. Replace screen-grid resistors with 2W metal film (two originals are toast as can be seen in the photos).
4. Replace all the tubes to begin with. I expect those poor old GECs are long gone by now and have no idea whether the preamp tubes are ok or not. I figure better to replace everything first, ensure everything is working well and then roll the old preamp tubes back in and compare if I feel so inclined. The plan is Tungsol for the ECC83s (current fav) with EH for the ECC81 and the KT88s. Would go for Tungsol on the 81 as well, but then will have order it from a different place.
5. Bias it up (very carefully).
6. Connect it up to a big pile o' speakers, plug in the EB-3L and proceed to see if it registers on the richter scale
Also, the mains fuse has been upped to 7A for some reason... I plan to go back to 5A and see how we go...
We have a decent soldering iron, a 'scope and also 4 x 100W rated 8ohm dummy loads. We've also both repaired plenty of amps in the past, though nothing quite this large.
I would really appreciate of some opinions on this plan before we get stuck in. Anything else that we should plan for up-front? Any suggestions for other things to watch out for? Other issues, such as noisy pots or bad sockets will of course also need to be rectified, should we encounter them. All original parts will be put aside and kept as well. Any tips for de/re-soldering the PSU wiring with a minimum of insulation meltage would also be handy.
Once we get stuck into it, we'll be happy to take any measurements or answer any questions about the amp that we can.
Thanks,
-Matt.